Bumdra Monastery Treks - 2 or 3 day options
Page updated: 25 March 2026
Introduction:
Trekking in Bhutan is unlike anywhere else in the Himalayas. Whether taking an easy flat stroll or an arduous hike, guests may experience crystal clear air, sensational views and very often have the trek route to themselves. All parties are accompanied by a trained guide, a cook, an assistant, at least one horseman and all treks are accommodated in tented campsites. Trekkers rarely have to carry more than a day pack as horses and yaks carry all provisions and most of the guest’s belongings.
Bumdra Monastery Trek: Options.
Trek Rating: MODERATE – means hard in places and good fitness required.
Maximum Altitude: 3,900-4000 metres.
Location: Paro
Trek Months: Mid-March to mid-June & October & November.
On the Bumdra Trek, trekkers will spend two (or 3) days traversing the area around the Bumdra Monastery. After driving to the trek point from your hotel, trekkers climb up to the temple and enjoy lunch and beautiful valley views. Higher up is the campsite and it is here that guests may learn why this trek is also called the “Trek of Thousand Dakinis (celestial female beings.)” Trekkers have the opportunity to explore the caves where the thousand dakinis had convened. In the descent from camp, trekkers will visit a number of temples including a hill top nunnery and the iconic Taktsang Monastery. Beautiful views of the Taktsang temple complex may be seen on the descent.
Please remember you must add at least 3 additional nights in Bhutan to complete this 2 day / 1 night trek. Two nights prior to commencement of trek (minimum duration required for acclimatisation purposes) & one night post trek before your departure from Bhutan.
Option 1: 2 days/1 night trek
- 2 nights Thimphu with sightseeing & day hiking
- 1 night Bumdra Trek
- 1 night Paro valley
Option 2: 3 days/ 2 night trek
- 2 nights Thimphu with sightseeing & day hiking
- 2 nights Bumdra Trek
- 1 night Paro valley
OR CALL THE BHUTAN TRAVEL EXPERTS: James – 0412 416 111, Nicola – 0413 598 669
ENQUIRE NOW
BOOKING FORM
Day 1: Bumdra Monastery Trek
Hike from Sang Choekor Buddhist College in the Paro valley (2,800 m) to Yak pasture where we camp below Bumdra Monastery (3,800 m)
The adventure begins with an early morning drive up to the Sang Choekor to meet our ponies; while they are being loaded we may pay our respects at the college. The initial one to two-hour ascent of a shady, forested ridge, brings us to a clearing with prayer flags and views down into both the Paro and Do Chhu Valleys.
Above and ahead the Chhoe Tse Lhakhang (temple) nestles on the mountainside a further one to two hour’s walk away. The trail undulates before the last steep section up to the pretty temple which may offer commanding views south over Paro and northwards to the snowcapped Himalayas.
After a final 20-minute climb through ruins and fluttering prayer flags, we plunge back into ancient forest, and, after traversing for about 40 minutes, we come out onto a high wide meadow dotted with sacred chortens and prayer flags.
Our home for the night is tucked away just under Bumdra Monastery (Cave of a Thousand Prayers) and may offer unimpeded views of the Himalayan range. After lunch we can visit the monastery (if it is occupied) and also climb the peak to the north (about 4000 m) for potentially even better views, returning in time for a well earned dinner.
Duration: 4–5 hours to camp depending on fitness, optional 2–3 hours return trek to peak
Difficulty: Moderate, guided with picnic.
Overnight: Tented Campsite
DAY 2: Bumdra Monastery Trek
Return hike from Bumdra Monastery camp via Zangto Pelri Monastery & Taktsang Monastery.
After a hearty breakfast, it is time to either head straight back into the valley or spend a little extra time soaking up the view. Eventually we have to drop back into the ancient pine and rhododendron forest on the monks’ zig-zagging trail.
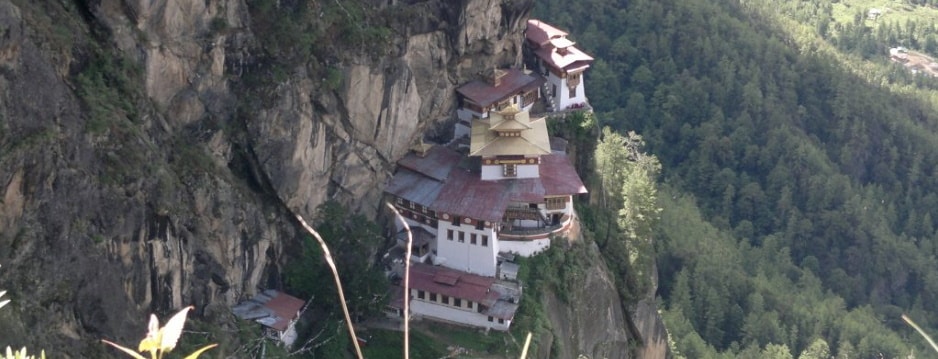
After one to two hours of descent we catch glimpses of the golden roofs of temples below. The path snakes across the mountainside between these monasteries before reaching the gardens of Zangto Pelri (Heaven on Earth) from which you can, if you are brave, peer over the edge, straight down onto the ornate rooftops of Taktsang Monastery perched against the cliff-face far below.
An hour later and we are across the gorge from Taktsang Monastery. Follow a steep descent to a waterfall then up some steps and you’ll reach the Tiger’s Nest itself. Retracing our steps we begin the final descent of about 45 minutes to Paro Valley floor to reach our vehicle from where you will be transferred by road to your overnight accommodation.
Duration: 5 – 7 hours depending on time taken in monasteries
Difficulty: Moderate
Bumdra Monastery Trek: Option 2 – 3 days / 2 nights.
This trek operates as per the 2 day/1 night version above, except adds a day at leisure in the Bumdra Lhakang area where you can visit the Lhakang and have an audience with the monks engaged in prayer and meditation.
In this monastery you have a clear view of the cave believed to have 100,000 footprints of Dakanis – Goddess & fairies. After your Lhakang visit climb the nearby ridge for approx 30 minutes for a potentially magnificent view of sacred Mt Jhomolhari (mountain of the Goddess) along with other Himalayan peaks and also the sky burial site, still used today.